PODS Loading and Unloading in the Bay Area
Whether your PODS just arrived and needs to be filled, or it was delivered to your new home and needs to be unloaded, we handle both ends. Our crew loads PODS containers strategically and unloads them with the same care, so your belongings stay protected and land in the right rooms.
Licensed & Insured
Cal-T201700
Loading Your PODS. Unloading It Too.
Whether your PODS just arrived in your driveway and needs to be filled before pickup, or it was delivered to your new home and needs to come out, we handle both ends. We also load and unload U-Pack ReloCubes, 1-800-PACK-RAT containers, Zippy Shell units, and most other portable container brands. The loading strategy is the same across brands, though dimensions and access vary, and we adjust for each.
A lot of people load their own container and regret it for two reasons. First, furniture doesn't fit the way they expected, boxes shift and crush each other during transit, and the container runs out of space before everything is in. Second, and more expensive, a poorly loaded container usually means paying for a second one. On the unloading side, DIY unloading usually ends with furniture piled in the garage and the wrong boxes in the wrong rooms, because people pull things out without a plan and end up exhausted halfway through.
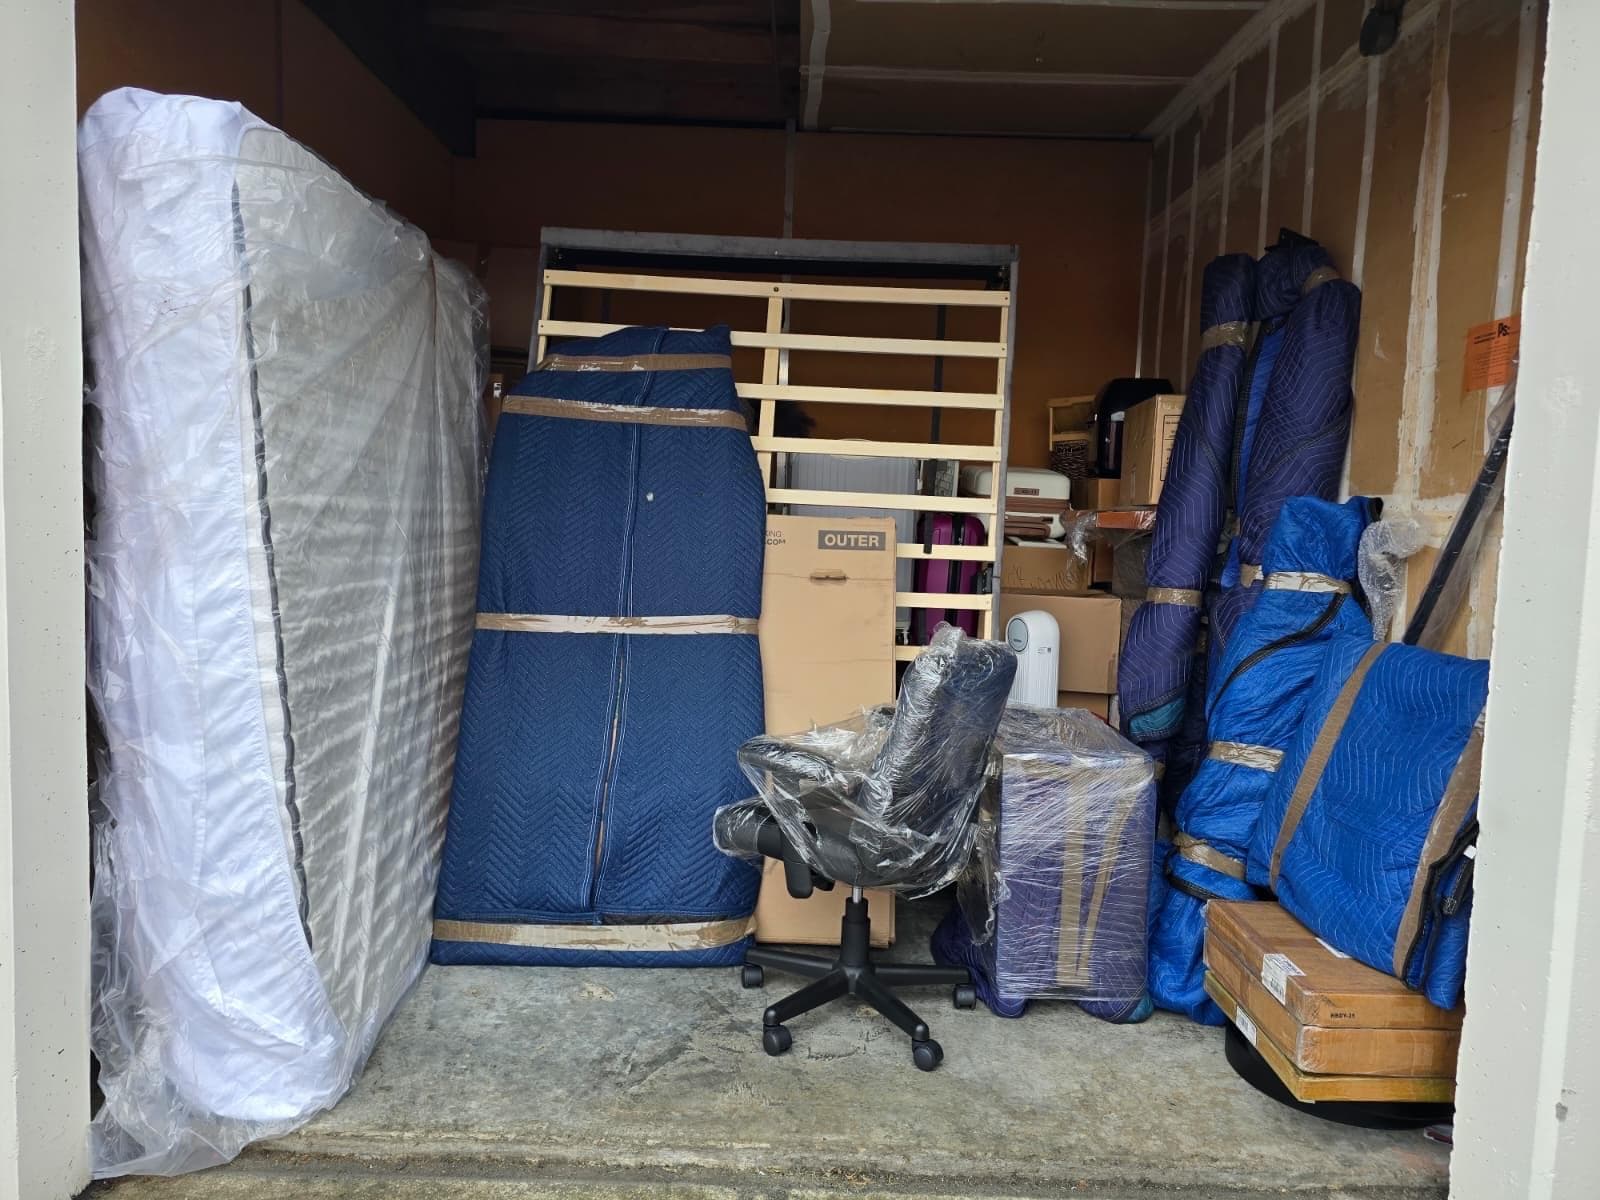
Our crew loads containers strategically and unloads them with the same care. On the loading side, heavy pieces go in first against the back wall, boxes stack floor to ceiling in columns, and gaps get filled so nothing shifts during weeks or months of storage. On the unloading side, furniture comes out and goes directly to the room it belongs in, not piled in the living room for you to sort through after the crew leaves.
Every job includes moving blankets, shrink wrap, tape, floor runners, and crew tools at no extra charge, plus up to 2 TV boxes and 5 wardrobe boxes for use during the job. These materials stay with the crew and don't remain inside the container. If you want packing supplies that stay with your belongings inside the PODS (bubble wrap, dish boxes, packing paper for fragile items), that's our paid packing service, quoted upfront.
Billing is hourly with a minimum, prorated in 15-minute increments. A $100 deposit holds your date and applies to the final invoice. Every estimate includes a written Not to Exceed price. Licensed under Cal-T201700 with full cargo and liability insurance.
The Cube Efficiency Math (Why Professional Loading Often Pays for Itself)
This is the single thing most DIY container loaders don't realize until it's too late. How efficiently a container gets loaded has a direct, measurable impact on how much you pay for the move, because the alternative to a tight load is renting a second container.
Here's the math. A standard 16-foot PODS container has roughly 857 cubic feet of usable space. A typical well-loaded 16-foot PODS holds the contents of a full 3-bedroom home or a lightly furnished 4-bedroom. A typical DIY load of the same home fits maybe 60 to 70 percent of what a professional load fits, which means the last 30 to 40 percent has to go somewhere, and the answer is almost always a second container.
Current PODS pricing in the Bay Area (as of early 2026):
- Delivery and pickup: roughly $75 to $100 per end, per container
- Monthly rental: roughly $250 to $500 depending on container size
- Transport fees: vary by distance, but a second container doubles them too
A second container for a month adds up to somewhere between $400 and $700 all in. Two months is between $650 and $1,200. For cross-country PODS moves, the delta can be over $2,000.
A 4-hour load with a 2-person professional crew at Bay Area rates is typically $500 to $700. Even in the best case, that's roughly break-even on a one-month move. In the typical case (two-month storage, cross-region move, larger home), the professional load pays for itself several times over.
This isn't marketing. The physics of packing a 16-foot box efficiently requires planning (back-to-front loading, weight distribution, vertical vs horizontal orientation, gap filling), and planning requires knowing how the pieces fit before you start. Someone loading their own container for the first time doesn't have that knowledge, and the container shows it.
How a Professional Container Load Actually Works
"We'll load it strategically" is vague. Here's what that actually means when the crew shows up.
Inventory walkthrough first. Before anything goes in, the crew walks through the home and identifies the pieces that will dictate the load plan. That means the heaviest items, the longest items, anything awkwardly shaped, mattresses, couches, and large appliances. These pieces determine where everything else goes because they can't flex and move to accommodate each other.
Heavy and tall items against the back wall. Refrigerators, washers, dryers, tall dressers, armoires, and heavy bookcases go in first, standing upright, pushed flush against the back wall of the container. This establishes a stable base structure for everything that comes after, keeps the container's weight distribution balanced for road transport, and maximizes vertical space usage on the walls where it's hardest to fit items otherwise.
Mattresses and headboards on edge along the side walls. Mattresses stood on their edges along the inner walls of the container do two things: they protect the mattress from the weight of items stacked on top, and they pad the side walls so furniture doesn't get scuffed by the container's interior during transit. A mattress laid flat on the floor wastes the most valuable cubic footage in the container and can be compressed by the weight of items placed on it.
Long items oriented along the long axis of the container. Couches, dining tables, long bookshelves, and ladders go in oriented lengthwise along the container, not across it. A 7-foot couch placed across the container wastes several feet of length. Placed lengthwise along one wall, it takes up the same square footage but leaves a usable corridor for everything else.
Boxes stack in columns, floor to ceiling, heaviest to lightest. Once the furniture is in, boxes fill the remaining space in columns. Heaviest boxes on the bottom (books, dishes, pantry items), medium weight in the middle, lightest and most fragile on top. Columns get built tight against each other with no gaps. The goal is a wall of boxes that can't shift during transit because there's nowhere for it to go.
Soft items fill the gaps. Once the heavy items and boxes are in, soft items (pillows, linens, towels, blankets, stuffed animals) get tucked into every remaining gap. This serves two purposes: it uses up dead space that would otherwise go empty, and more importantly, it prevents road vibration from letting anything shift. A container with gaps is a container where everything inside is bouncing against its neighbors for however long the container is in storage or transit.
Fragile items near the top, in their own stacked zone. Electronics, glassware, lamps, and anything marked fragile get placed near the top of the load where they're not bearing weight. If the fragile zone is large, it gets its own section rather than being spread throughout.
Wrap everything before it goes in, not after. This is different from how some movers handle it. Every piece of furniture gets blanket-wrapped and shrink-wrapped before loading, because once the piece is in the container, you can't access it to wrap it properly. Doing the wrapping right before loading adds time but prevents the most common PODS damage pattern, which is scuffed furniture from rubbing against other items during weeks of storage.
Container Placement: Driveway, Street, or Neither
Where your PODS gets placed matters for both the loading day and the weeks it sits before pickup. This is where a lot of container jobs run into trouble that could have been prevented with some planning.
Driveway placement. The ideal in most cases. The container sits on your property, requires no permit, and the crew has direct access from your front door. Works in most East Bay residential neighborhoods in Richmond, El Cerrito, Albany, Hercules, Pinole, Walnut Creek, and parts of Oakland and Berkeley. Two things to check: your driveway grade (very steep driveways can make container placement awkward and may require the delivery truck to stage on the street instead) and your HOA rules (some HOAs restrict how long a container can sit on a driveway, typically 7 to 14 days).
Street placement. Required when a driveway isn't available. This is where things get complicated. Many Bay Area cities require a permit for a container placed on a public street, especially for durations longer than 24 to 72 hours. San Francisco has strict limits and requires permits through SFMTA for any container on a public street. Berkeley, Oakland, and Richmond each have their own rules, typically administered through the city public works department. Check with your city before scheduling the container delivery, because arranging the permit after the container is placed is a much harder problem than arranging it beforehand.
Apartment and condo complexes. Most property management companies have specific rules about where PODS can be parked and for how long. Some allow them in designated areas of the parking lot. Some prohibit them entirely and require arrangements with an off-site storage yard. Ask building management before ordering the container.
San Francisco specifically. SF is the hardest city in the region for container placement. Street parking restrictions, limited driveway access in most neighborhoods, and strict SFMTA permit requirements mean many SF PODS loads end up happening at an off-site container company yard rather than at the residence. The crew loads the container at the yard, the container company transports it, and the process is the same operationally. This adds a layer of logistics but often works better than fighting street placement in a dense neighborhood.
Know your placement situation before you book the container. The crew's job starts when the container is in place and ready, and a placement problem that delays the container delays everything else.
PODS vs. U-Pack vs. 1-800-PACK-RAT vs. Zippy Shell
All four major portable container companies do roughly the same thing, but the operational details differ in ways that affect how loading actually works.
PODS. The market leader. Three container sizes (7-foot, 12-foot, 16-foot) with different capacities. The 16-foot PODS is the most common for full household moves. Steel-frame construction, waterproof, secure. PODS handles both storage and long-distance transport. Delivery and pickup windows are typically scheduled in 3-hour blocks. Loading and unloading requires ground-level container placement.
U-Pack ReloCubes. Smaller than PODS (roughly 6 feet by 7 feet by 8 feet, or about 330 cubic feet each), but multiple cubes can be ordered for a single move. U-Pack specializes more in long-distance transport than local storage, so the typical customer is moving out of state rather than storing locally. The smaller size means most households need 2 to 3 ReloCubes for a full move, which changes the loading approach because each cube has to be loaded to fit what will go in it specifically.
1-800-PACK-RAT. Similar to PODS in size and approach. Steel-frame containers in 8-foot, 12-foot, and 16-foot sizes. The main operational difference is the container's build and door design, which affects some loading details. PACK-RAT tends to be price-competitive with PODS and covers similar service areas.
Zippy Shell. Offers a narrow trailer design (5 feet wide) that fits in tighter spaces than standard PODS. Useful for homes where PODS placement is impossible due to access constraints. Similar loading principles apply but the narrower width changes the spatial arrangement for some pieces.
Other options. SMARTBOX, U-Haul U-Box, and regional container companies also exist. If you're using one of these and want to know if we can work with it, call us. Loading strategy is essentially the same across all rigid containers, with minor adjustments for door position and dimensions.
If you haven't ordered a container yet and are deciding between brands, the factors that matter most are: how long you need storage (PODS and PACK-RAT for longer storage, U-Pack for shorter-term long-distance), placement constraints at your home (Zippy Shell if access is tight), and pricing in your zip code (varies significantly). The loading process on our end is the same across all of them.
Loading Day Prep
Even with the crew doing the heavy lifting, a few hours of prep on your end significantly improves the day.
Confirm the container placement before the delivery driver arrives. Make sure the driveway, street spot, or designated area is clear and accessible. The container can't be repositioned easily once dropped, so the initial placement matters.
Handle appliance disconnects the day before loading. Refrigerators need to be unplugged, drained, and dried at least 24 hours in advance to prevent water damage during storage. Washers need water lines disconnected. Gas ranges need gas lines disconnected by a plumber or gas technician. Plan this with the appropriate vendors before loading day.
Don't pack the kitchen in loose boxes. Items in the kitchen (dishes, glassware, pantry) should be packed in properly sized boxes with proper cushioning before the crew arrives, because the crew loads what's ready and doesn't pack what isn't. If you want us to pack fragile items, add packing to the job at booking.
Label boxes by destination room. When unloading day comes, room labels let the crew place each box where it belongs without asking. Contents labels are less useful because the unload crew doesn't need to know what's in each box, just where it goes.
Separate what isn't loading. Items you're leaving behind, donating, selling, or handling yourself should be clearly marked or physically separated before the crew arrives. A "do not load" sticky note on a clearly marked pile works. Loading items that weren't supposed to go is the single most common cause of wasted time on PODS loads.
Check parking and access on the unload end. If you're also hiring us for the unload when the container reaches the destination, confirm parking, building access, elevator reservations if applicable, and any access constraints at the new home before that day.
Unloading Day: What to Expect
When the container reaches the destination, the unload process is straightforward if a few things are in place.
Know where things go. The crew can place furniture and boxes correctly the first time if you have a rough idea of the layout. Which bedroom is the primary bedroom. Which direction the couch faces in the living room. Where the bookshelves go. This doesn't need to be a detailed floor plan, but walking through the house with the crew lead for 5 minutes before the unload starts saves 30 minutes of shuffling pieces later.
Handle reconnects with the right vendors. Just like disconnects for loading, reconnecting appliances at the new home needs a plumber, electrician, or appliance installation service. Schedule these for after the unload, not during.
Check placement before the crew leaves. Walk through with the crew lead and confirm every major piece is where you want it. If something needs to be repositioned, say so before the crew finishes. Moving a heavy piece later costs a lot more (and a lot more backaches) than adjusting it while the crew is still on the clock.
Packing materials leave with the crew. The moving blankets, shrink wrap, floor runners, and tape the crew used are ours and go with us when we leave. If you paid for packing materials inside the container (bubble wrap, dish boxes, packing paper), those are yours to keep or recycle. Used cardboard from unpacking can usually be broken down and recycled with your normal city pickup.
Container Loading We Do Every Week
Most of our container work falls into a handful of patterns.
Renters between leases. Someone whose lease ends before their new place is ready. PODS provides 1 to 3 months of storage while they bridge the gap. Common in Oakland, Berkeley, and Albany during summer lease turnovers.
Long-distance moves. Customers moving out of state who don't want to drive a rental truck or pay a full-service interstate mover. We load the PODS, the container company transports it, and sometimes we unload at the destination (if it's within driving distance of a partner crew, which varies).
Home staging and renovations. Homeowners preparing to list and sell who need to remove most of their belongings for staging, or in the middle of a renovation that requires clearing out a room or the whole house. Short-term container storage on-site, with us loading at the start and unloading when the project is done.
Cross-country relocations using U-Pack. Customers moving to the East Coast or Midwest who chose U-Pack for the price advantage over full-service interstate movers. We load the ReloCubes at origin and, depending on the destination, may be able to refer a partner crew for the unload.
Students and graduate students. UC Berkeley, UCSF, and Stanford students whose summer storage problem gets solved by a PODS rather than a storage unit. Load in June, unload in August.
Downsizing sales. Families selling a larger home and moving into a smaller one where not everything fits. PODS stores the pieces that aren't making the immediate move while decisions get finalized about what to keep, sell, or donate.
What to Do Now
- Call or fill out the online form for a free estimate. Give us the home size, the container size, the placement situation, and your delivery or pickup window.
- Confirm container placement with the container company and your city if a permit is needed.
- Schedule appliance disconnects (and reconnects if we're also unloading) with the appropriate vendors.
- Pack what needs packing before loading day, or add packing to the job at booking.
- Separate anything not loading so it doesn't end up in the container.
- Book early if you're in peak season. End of month and summer weekends fill up fastest.
Before hiring anyone for container work, verify their California moving license through the BHGS license search tool. Our license number is Cal-T201700.
See all our moving services or get your free estimate today.
Get a Free Estimate
Call us or fill out our form for an honest quote with no hidden fees.
(510) 495-1884Or fill out our formWhy JH Moving
Moving and Storage Services in Action
Everything You Get With PODS Loading & Unloading
What Customers Say About Our Container Loading Services
Real customers, real moves, real results.
Frequently Asked Questions
Billing is hourly with a minimum, prorated in 15-minute increments. Every estimate includes a written Not to Exceed price, which is the legal maximum you can be charged for the job as scoped. A studio typically runs 2 to 4 hours, a 1-bedroom 3 to 6 hours, a 2-bedroom 4 to 8 hours, and a 3-bedroom 6 to 10 hours. Each additional mover adds roughly $50 to $70 per hour. Time depends on load volume, stairs, and how far the crew has to carry items between the home and where the PODS is parked. A $100 deposit secures your crew and applies to the final invoice. Call (510) 495-1884 for a free estimate.
You Might Also Need
Ready to Load or Unload Your Container?
Get a free estimate today. We'll size the crew to your container, schedule around your pickup or delivery window, and handle the strategic loading that saves you from paying for a second container.
Licensed Cal-T201700. 270+ five-star reviews. Family-owned and based in Richmond for 7 years.
Call (510) 495-1884 or request your free estimate online.
Serving the East Bay & Bay Area